
Creating a polished concrete floor might sound like a simple process, but transforming a dull slab into a sleek, shiny masterpiece takes skill, precision, and a bit of elbow grease (or a diamond grinder, in our case). At NZ Grinders, we’ve polished countless Tauranga floors, so we’re here to break down the process step by step. Whether you’re curious about the magic behind the shine or considering it for your own space, we’ve got you covered.
Step 1: Evaluate and Prep the Surface
Every great project starts with a solid foundation—or in our world, a good look at your existing concrete. We check for cracks, uneven surfaces, or contaminants like glue or paint that might interfere with polishing. If the slab’s got character (a polite way of saying it’s a bit of a mess), we prep it by grinding off the imperfections.
Our team at NZ Grinders knows Tauranga’s concrete isn’t always flawless. That’s why we use top-notch tools and techniques to ensure your surface is ready to shine. No shortcuts here!
Step 2: Start the Grinding Process
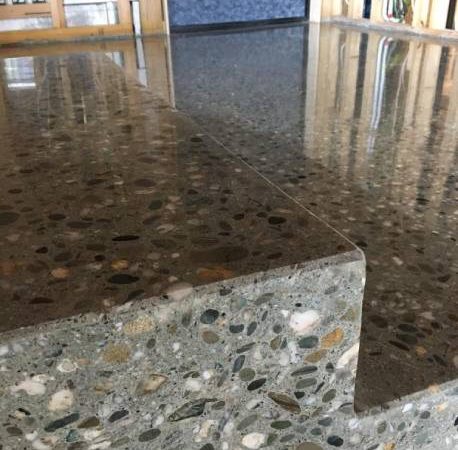
Once the prep work is done, the real fun begins. Grinding is where we smooth out the surface and decide on the level of aggregate exposure. Want a salt-and-pepper finish? Easy. Prefer to showcase the full stone aggregate for a bold look? We can do that too.
Using industrial-grade diamond grinders, we gradually move through different grit levels, starting coarse to remove flaws and working finer for a smoother finish. It’s a bit like sanding wood, but with a lot more sparkle (and less splinters).
Step 3: Apply a Densifier
At this stage, we apply a densifier to the concrete. This liquid product penetrates the slab, hardening it and making it more durable. It’s like giving your floor a secret superpower to withstand wear and tear, especially in high-traffic Tauranga spaces.
Think of it as the spinach to Popeye—your concrete will be stronger and ready for whatever life throws at it.
Step 4: Polish to Perfection
This is where the magic happens. Using progressively finer grits of diamond polishing pads, we bring out the shine. Whether you want a soft matte glow or a mirror-like finish that dazzles, we’ll achieve the look you’re after.
Polishing isn’t just about aesthetics. It seals the surface, making it resistant to stains, dust, and moisture. Plus, polished concrete is low-maintenance, so it’s perfect for busy Tauranga homes and businesses.
Step 5: Apply a Protective Coating
For extra durability, we can add a protective coating. This step is optional, but it gives your floor added resistance against spills, scratches, and scuffs. At NZ Grinders, we recommend it for areas prone to heavy traffic or accidental coffee spills.
Step 6: Stand Back and Admire
The final step? Admire your brand-new polished concrete floor. Whether it’s in your Tauranga home, office, or showroom, the transformation is undeniable. We’ve lost count of how many clients have been blown away by the difference.
Why Choose NZ Grinders for Your Concrete Polishing?
Polishing concrete isn’t just a job for us—it’s an art. At NZ Grinders, we pride ourselves on delivering top-tier results with a touch of humor (because who said floors can’t be fun?). We work with precision, care, and a commitment to ensuring your space looks its absolute best.
Let’s Get Polished!
Thinking about polished concrete for your Tauranga property? Let NZ Grinders handle the hard work while you sit back and plan how to show off your stunning new floor. Contact us today, and let’s turn your concrete into something spectacular!
For project-specific advice or information, please give us a call, North Island Glen 021-434-199, South Island Mike 027-281-8815 or email Ian, our sales manager.